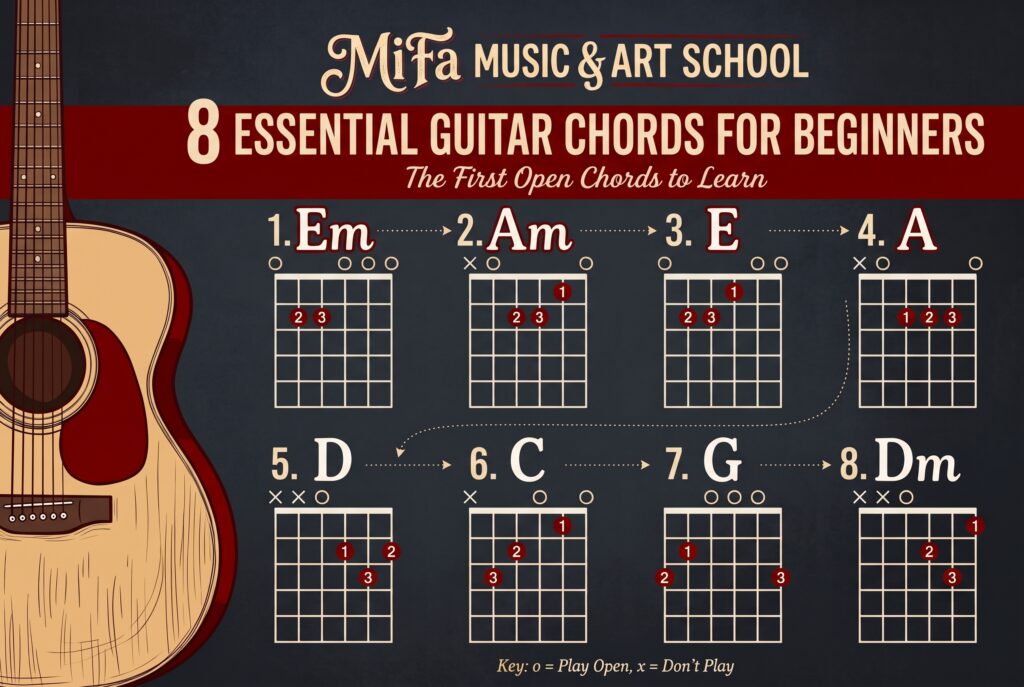
If you are picking up the instrument for the first time, the best guitar chords for beginners to learn first are open chords. Specifically, your starting lineup should include eight foundational shapes: E minor (Em), A minor (Am), E major (E), A major (A), D major (D), C major (C), G major (G), and D minor (Dm).
These are called “open chords for beginners” because they combine pressed-down strings with strings that ring out “open” (without any fingers holding them down). They are played close to the headstock of the guitar, require only two or three fingers to fret, and form the building blocks for countless songs across all genres of music.
Whether you are teaching yourself or looking to complement professional instruction, this guide will take you step-by-step through the first guitar chords to learn, how to place your fingers correctly, and how to start changing between them smoothly. (Note: Before you start, make sure your guitar is in Standard Tuning: E-A-D-G-B-E, from thickest string to thinnest).
What Guitar Chords Should Beginners Learn First?
When starting out, it is best not to overwhelm yourself with dozens of complex shapes. Instead, focus on a core group of basic guitar chords. These eight easy guitar chords are grouped below by their general level of difficulty to help you structure your practice.
| Chord Name | Abbreviation | Difficulty Level | Learning Note |
| E minor | Em | Very Easy | Uses only two fingers; a great first chord to build confidence. |
| A minor | Am | Easy | Introduces a three-finger shape that keeps your hand compact. |
| E major | E | Easy | The exact same finger shape as Am, just moved over one string. |
| A major | A | Easy | Requires stacking three fingers comfortably in the same fret. |
| D major | D | Moderate | Forms a triangle shape; requires careful strumming to avoid the thickest strings. |
| C major | C | Moderate | Requires a wider finger stretch across three different frets. |
| G major | G | Moderate | Requires a wide stretch between your index/middle fingers and your ring finger. |
| D minor | Dm | Moderate | A slightly awkward stretch for the ring finger, but essential for minor progressions. |
How to Play the Essential Beginner Guitar Chords
To ensure you are learning these beginner guitar chords step by step, we will break down the exact guitar chord finger placement for each shape.
Note: Fingers are numbered 1 (index), 2 (middle), 3 (ring), and 4 (pinky). Strings are numbered 1 to 6, with the 1st string being the thinnest (bottom) and the 6th string being the thickest (top).
E minor (Em) and A minor (Am)
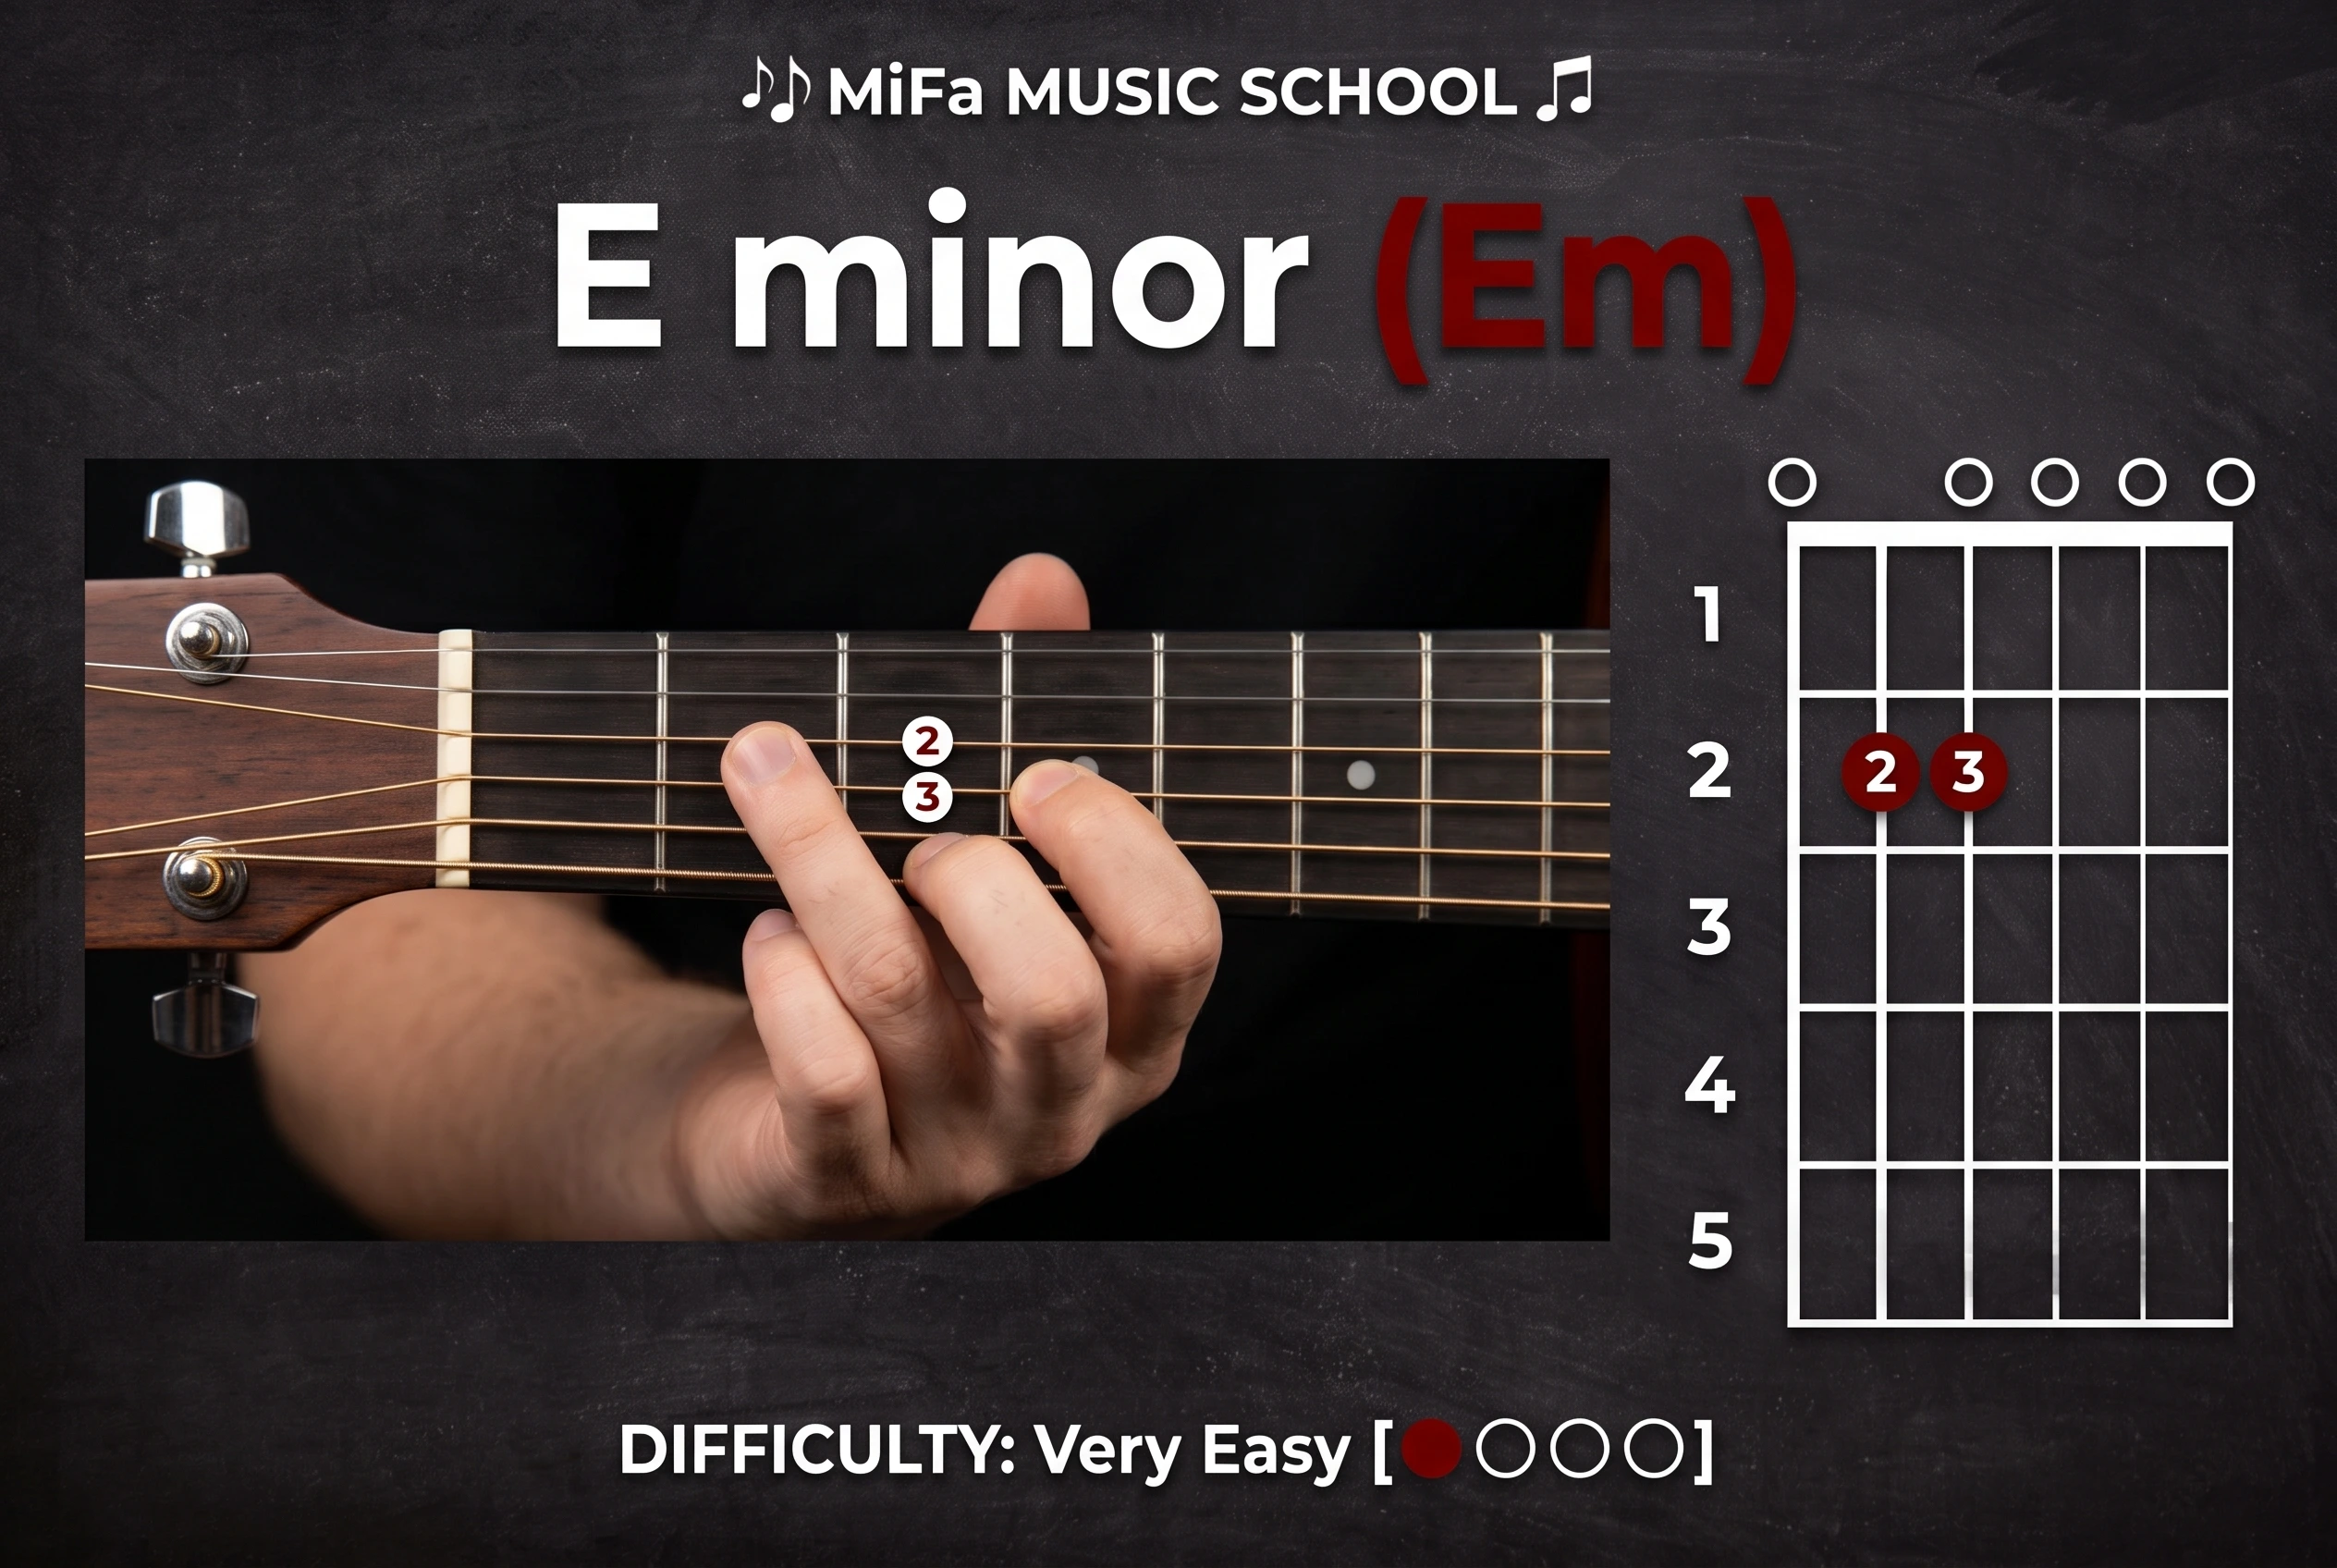
E minor chord guitar (Em) is arguably the easiest chord on the guitar.
- Finger Placement: Place your 2nd finger on the 5th string at the 2nd fret, and your 3rd finger on the 4th string at the 2nd fret.
- Strings to Strum: Strum all 6 strings
A minor chord guitar (Am) is a foundational minor shape that sounds slightly sad or moody.
- Finger Placement: Place your 1st finger on the 2nd string (1st fret), your 2nd finger on the 4th string (2nd fret), and your 3rd finger on the 3rd string (2nd fret).
- Strings to Strum: Strum the bottom 5 strings. Avoid hitting the thick 6th string.
E major (E) and A major (A)
E major chord guitar (E) shares the exact same hand shape as A minor, just shifted closer to the ceiling.
- Finger Placement: Place your 1st finger on the 3rd string (1st fret), your 2nd finger on the 5th string (2nd fret), and your 3rd finger on the 4th string (2nd fret).
- Strings to Strum: Strum all 6 strings.
A major chord guitar (A) requires you to squeeze three fingers into a single fret.
- Finger Placement: Place your 1st, 2nd, and 3rd fingers on the 4th, 3rd, and 2nd strings, respectively. All three fingers should sit inside the 2nd fret.
- Strings to Strum: Strum the bottom 5 strings, leaving the thick 6th string muted.
D major chord guitar (D)
D major (D) creates a bright, uplifting sound and introduces a triangle shape.
- Finger Placement: Place your 1st finger on the 3rd string (2nd fret), your 2nd finger on the 1st string (2nd fret), and your 3rd finger on the 2nd string (3rd fret).
- Strings to Strum: Strum only the bottom 4 strings. Striking the 5th or 6th string will make the chord sound muddy.
C major chord guitar (C)
C major (C) is a staple in popular music but requires a slightly wider stretch.
- Finger Placement: Place your 1st finger on the 2nd string (1st fret), your 2nd finger on the 4th string (2nd fret), and your 3rd finger on the 5th string (3rd fret).
- Strings to Strum: Strum the bottom 5 strings.
G major chord guitar (G)
G major (G) pairs perfectly with C and D, but requires utilizing the very top and very bottom of the fretboard simultaneously.
- Finger Placement: Place your 1st finger on the 5th string (2nd fret), your 2nd finger on the thick 6th string (3rd fret), and your 3rd finger on the thin 1st string (3rd fret).
- Strings to Strum: Strum all 6 strings.
D minor chord guitar (Dm)
D minor (Dm) is slightly trickier due to finger spacing, but
- Finger Placement: Place your 1st finger on the 1st string (1st fret), your 2nd finger on the 3rd string (2nd fret), and your 3rd finger on the 2nd string (3rd fret).
- Strings to Strum: Strum only the bottom 4 strings.
How to Read a Guitar Chord Diagram
As you learn how to play guitar chords, you will encounter chord diagrams (also called chord boxes). They are simple visual representations of the guitar fretboard. Here is how to read them:
- Vertical Lines: These represent the six strings of the guitar. The line furthest to the left is the thickest string (6th string), and the line furthest to the right is the thinnest string (1st string).
- Horizontal Lines: These represent the metal frets on the neck of the guitar. The thick line at the top is the “nut” of the guitar.
- Dots with Numbers: These show you exactly where to press down on the strings. The numbers inside the dots tell you which finger to use (1 = index, 2 = middle, 3 = ring, 4 = pinky).
- The “O” Symbol: An “O” placed above a string means you should play that string “open” (unfretted).
- The “X” Symbol: An “X” placed above a string means you should not play that string. You must either avoid strumming it or mute it.
How to Change Between Guitar Chords
Knowing where to put your fingers is only the first step; learning how to change guitar chords seamlessly is where the real music happens. When you practice switching guitar chords, keep these principles in mind:
- Look for Anchor Fingers: Sometimes, a finger doesn’t need to move at all when changing chords. For example, when moving from Am to C, your 1st and 2nd fingers stay in the exact same place. You only need to move your 3rd finger.
- Move Your Fingers as a Group: Instead of placing your fingers down one by one, try to form the shape of the next chord in the air as your hand travels, landing all fingers on the strings simultaneously.
- Keep Your Fingers Close to the Fretboard: When lifting your hand to change chords, do not pull your fingers inches away from the guitar. Keep them hovering just millimeters above the strings to reduce travel time.
- Practice Slow Transitions: Use a metronome at a very slow speed. Strum the first chord, use the time in between the clicks to transition, and try to land the second chord right on the next click.
Easy Guitar Chord Progressions for Beginners
Once you have memorized a few shapes, it is time to combine them into beginner guitar chord progressions. Try practicing these two incredibly common progressions, which are the backbone of hundreds of famous hits.
Progression 1: G – C – D
This is a classic major progression found in countless folk, rock, and pop songs (it is the foundation for songs like Sweet Home Alabama by Lynyrd Skynyrd and Ring of Fire by Johnny Cash). Strum each chord four times before moving to the next. Focus heavily on the jump between C and D, as this requires your hand to completely change shape.
Progression 2: Em – C – G – D
This four-chord loop is the absolute powerhouse of modern music, used in everything from Zombie by The Cranberries to modern pop hits. Because Em is so simple, it gives you a strong starting point. The transition from G to D is excellent practice for targeted strumming, as you must go from strumming all six strings (G) to only the bottom four (D).
Common Beginner Guitar Chord Problems and How to Fix Them
It is perfectly normal for your chords to sound a little messy at first. Here is how to troubleshoot the most common issues:
- Buzzing Strings: If a string is buzzing instead of ringing out clearly, you are likely not pressing down hard enough, or your finger is too far back in the fret. Try sliding your finger as close to the metal fret wire (the one closest to the body of the guitar) as possible without sitting directly on top of it.
- Muted or “Dead” Strings: If a string makes a dull thud, another finger is accidentally leaning on it. Ensure you are using the very tips of your fingers to press the strings, and arch your knuckles dramatically so your fingers come down vertically, like little hammers.
- Accidental Strumming of “X” Strings: If you find yourself hitting strings you shouldn’t (like the thick 6th string on a D chord), practice isolating your strumming hand. Look closely at your right hand while you strum, intentionally aiming your pick or thumb only at the required strings.
How Should Beginners Practice Guitar Chords?
Building muscle memory requires consistency. A 15-minute daily practice routine is far more effective than practicing for two hours once a week.
A 15-Minute Daily Routine:
- Minutes 1–5 (Warm-up): Pick two chords (e.g., Em and Am). Practice pressing them down, strumming once to ensure every string rings clearly, and then relaxing your hand.
- Minutes 5–10 (Transitions): Practice switching guitar chords. Alternate between two chords slowly. Do not worry about a rhythm yet; just focus on getting your fingers to the right place accurately.
- Minutes 10–15 (Musical Practice): Pick one of the simple beginner guitar chord progressions above. Set a slow tempo and practice strumming rhythmically.
Realistic Expectations: Your fingertips will likely be sore for the first few weeks until calluses develop. This is normal. If the pain becomes sharp, take a day off to let your skin recover.
Frequently Asked Questions about chord guitar
What are the absolute first chords to learn on guitar?
E minor (Em) and A minor (Am) are widely considered the best first chords to learn because they require only two or three fingers and utilize natural, comfortable hand positions.
How many chords do I need to know to play songs?
You only need to know three or four chords to start playing songs. The combination of G, C, D, and Em will unlock hundreds of popular songs.
How much should a beginner practice chords?
Aim for 15 to 20 minutes a day. Consistent, daily repetition is the most effective way to build the muscle memory required for clean chord transitions.
Will my fingers get sore playing guitar chords?
Yes, mild fingertip soreness is completely normal for beginners. Over the course of two to four weeks of consistent practice, your skin will adapt and form protective calluses, and the soreness will disappear.
Are acoustic and electric guitar chords the same?
Yes. Major and minor guitar chords use the exact same finger placements regardless of whether you are playing an acoustic or an electric guitar. The only difference is that electric guitar strings are generally thinner and easier to press down.
Master the Guitar with Professional Guidance
Learning your first chords is a major milestone, but having an experienced instructor watch your technique can save you months of frustration and bad habits. Consistent practice combined with real-time feedback is the fastest way to progress from slow, clunky transitions to confident, musical playing.
If you are ready to take your playing to the next level, explore Guitar Lessons in North Vancouver at MiFa Music & Art School. Our expert instructors offer personalized, encouraging lessons designed to help you master the basics and start playing the music you love.